MỘT PHỤ NỮ PHÁP GỐC HÀN-QUỐC LÀM BỘ TRƯỠNG TRONG CHÍNH PHŨ CŨA TỔNG THỐNG HOLLANDE .
http://www.youtube.com/watch?v=3VcNSrKWo24
Tuesday, April 2, 2013


Sunday, March 31, 2013
COMPUTER CŨA TƯƠNG LAI SẼ GIỐNG NHƯ CÂY VIẾT MÁY ! ĐÂY LÀ KỸ THUẬT MỚI TỪ NHẬT BÃN .
Thưa các bạn ,
Tôi vừa nhận được 1 email sau đây từ 1 anh bạn . Với niềm đam mê mạnh mẽ về kỹ thuật , tôi đã lược dịch đễ chia sẽ thông tin này cùng các bạn .
Thưa các bạn ,
Tôi vừa nhận được 1 email sau đây từ 1 anh bạn . Với niềm đam mê mạnh mẽ về kỹ thuật , tôi đã lược dịch đễ chia sẽ thông tin này cùng các bạn .
You will not
be able to know what is ahead until
You have seen the 4 pictures and read the explanation of
What they are, our future is here, incredible!!
What an age we live in. (Bạn ko thễ biết cái gì trước mắt bạn cho tới khi bạn đã thấy 4 bức hình và đọc phần giải thích chúng là cái gì ; vì tương lai chúng ta ở đấy , ko thễ tưỡng tượng được !)

Look closely and guess what they could be... (Hãy nhìn thật kỹ và phõng đoán chúng là gì ...)

Are they pens with cameras? (Chúng là những cây bút với camera ? )

Any wild guesses? No clue yet?
Ladies and gentlemen.... Congratulations!
You've just looked into the future...
Yep that's right! (Cứ tha hồ mà phỏng đoán/tưỡng tượng ? Chưa tìm ra manh mối ? Thưa quí bà và quí ông ...Nhiệt liệt chào mừng ! Các bạn vừa nhìn vào tương lai ... Vâng đúng như vậy !)
You've just seen something
That will replace your PC in the near future (Các bạn vừa nhìn một thứ gì đó , sẽ thay thế máy tính cũa bạn trong tương lai gần) .
Here is how it works: (Nó vận hành như sau : )

In the revolution of miniature computers,
Scientists have made great developments with blue tooth technology...
This is the forthcoming computers you
can carry within your pockets . (Trong cuộc cách mạng cũa các máy tính siêu nhõ , các nhà khoa học đã có những phát triễn lớn với kỹ thuật blue tooth . Đây những computer , mà sắp tới đây , bạn sẽ có thễ bỏ chúng trong túi .)

This 'pen sort of instrument' produces both the monitor as well as the keyboard on any flat surfaces from where you can carry out functions you would normally do on your desktop computer. ("Loại dụng cụ có dạng cây viết " này sẽ tạo ra màn hình và keyboard trên bất cứ bề mặt phẳng để giúp bạn tiến hành công việc mà thông thường bạn làm trên máy tính đễ bàn) .


Can anyone say, 'Good-bye laptops!
Looks like our computers are out of date...
again!!! (Có thễ có ai đó nói , " Giã từ laptop ! Có vẽ những máy tính cũa chúng ta sẽ quá đát lần nữa !!! ")
San Jose ngày CN 31/3/13 .
What they are, our future is here, incredible!!
What an age we live in. (Bạn ko thễ biết cái gì trước mắt bạn cho tới khi bạn đã thấy 4 bức hình và đọc phần giải thích chúng là cái gì ; vì tương lai chúng ta ở đấy , ko thễ tưỡng tượng được !)
Look closely and guess what they could be... (Hãy nhìn thật kỹ và phõng đoán chúng là gì ...)
Are they pens with cameras? (Chúng là những cây bút với camera ? )
Any wild guesses? No clue yet?
Ladies and gentlemen.... Congratulations!
You've just looked into the future...
Yep that's right! (Cứ tha hồ mà phỏng đoán/tưỡng tượng ? Chưa tìm ra manh mối ? Thưa quí bà và quí ông ...Nhiệt liệt chào mừng ! Các bạn vừa nhìn vào tương lai ... Vâng đúng như vậy !)
You've just seen something
That will replace your PC in the near future (Các bạn vừa nhìn một thứ gì đó , sẽ thay thế máy tính cũa bạn trong tương lai gần) .
Here is how it works: (Nó vận hành như sau : )
In the revolution of miniature computers,
Scientists have made great developments with blue tooth technology...
This is the forthcoming computers you
can carry within your pockets . (Trong cuộc cách mạng cũa các máy tính siêu nhõ , các nhà khoa học đã có những phát triễn lớn với kỹ thuật blue tooth . Đây những computer , mà sắp tới đây , bạn sẽ có thễ bỏ chúng trong túi .)
This 'pen sort of instrument' produces both the monitor as well as the keyboard on any flat surfaces from where you can carry out functions you would normally do on your desktop computer. ("Loại dụng cụ có dạng cây viết " này sẽ tạo ra màn hình và keyboard trên bất cứ bề mặt phẳng để giúp bạn tiến hành công việc mà thông thường bạn làm trên máy tính đễ bàn) .
Can anyone say, 'Good-bye laptops!
Looks like our computers are out of date...
again!!! (Có thễ có ai đó nói , " Giã từ laptop ! Có vẽ những máy tính cũa chúng ta sẽ quá đát lần nữa !!! ")
San Jose ngày CN 31/3/13 .
Saturday, March 30, 2013
These instructions will help you to remove and replace keyboards on
various laptops. I will not be able to cover all models but you’ll get
the idea. Steps for removing and replacing the keyboard are similar for
most laptops.
If your keyboard is missing a key, it’s not necessary to replace the whole keyboard. You can fix it using this guide: how to fix keys on a laptop keyboard.
Warning!
- if your laptop is still covered by the manufacturer’s warranty, do not open the case or you can loose the warranty.
- always remove the battery and unplug the AC adapter before you open the laptop case.
- if you damage the keyboard connector on the motherboard you’ll have to replace the whole motherboard.
- proceed on your own risk.
Sony laptop
I took these pictures from a Sony Vaio PCG-K33 (model PCG-9S1L) notebook. Should be similar for some other Sony notebooks too.
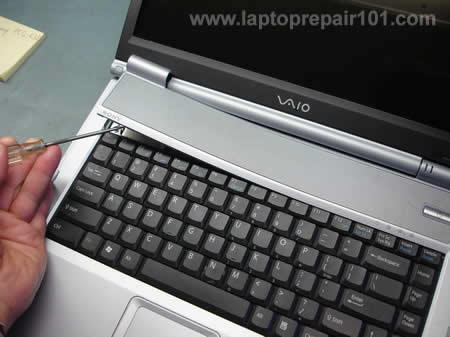
Insert a small flathead screwdriver under the keyboard bezel and carefully lift it up. Continue releasing plastic latches and removing the keyboard bezel with your fingers.
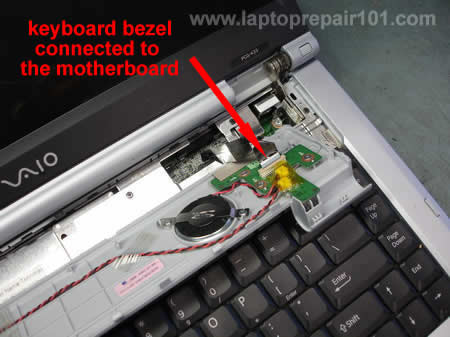
Be careful, on some models the bezel might be connected to the motherboard as it shown on the picture above. If you accidentally pulled the cable, connect it back. It is not necessary to disconnect the keyboard bezel from the motherboard in order to remove and replace the keyboard, just put it aside so you can access the keyboard screws.
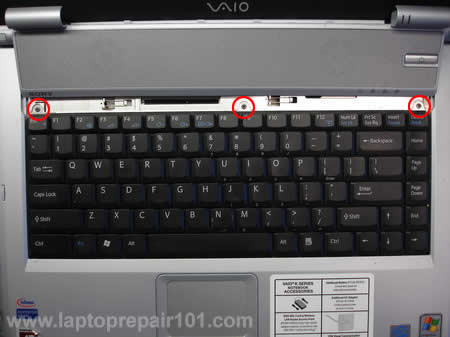
Remove three (or more) screws from the top of the keyboard. Carefully lift up the keyboard from the laptop case.
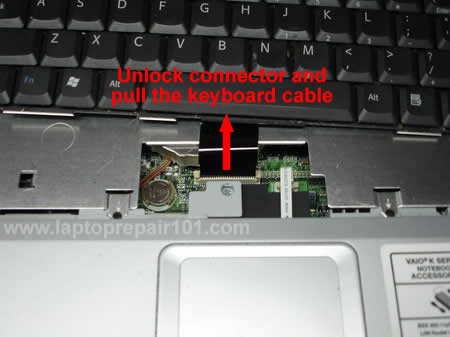
The keyboard connects to the motherboard via a flat ribbon cable. Before you pull the cable from the connector, you’ll have to unlock the connector.
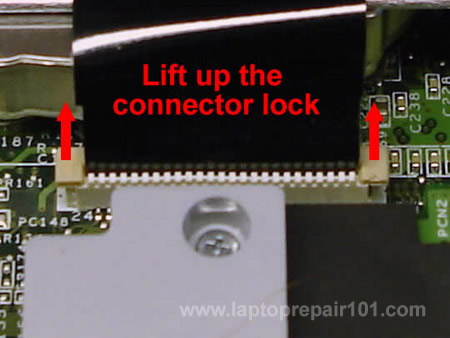
The image above illustrates how to unlock the keyboard connector. Carefully move the connector lock 2-3 millimeters up and after that pull the keyboard cable. To install the keyboard, follow the above mentioned steps in the reverse order.
Toshiba laptop
The following pictures were taken from a Toshiba Satellite A135 laptop. The keyboard removal instructions will be almost the same for most modern Toshiba laptops.
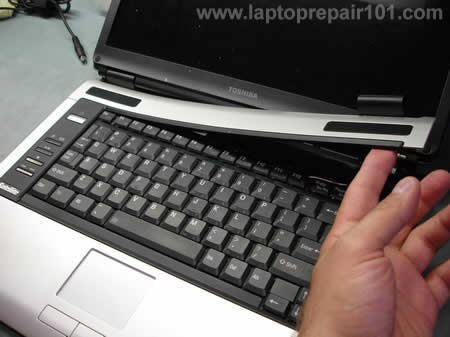
The keyboard bezel removal procedure is similar to the above mentioned Sony Vaio laptop. Lift it up with a small screwdriver and remove using fingers. On most Toshiba laptops the keyboard bezel doesn’t have any circuit board underneath, it’s just a piece of plastic and you don’t have to worry about cables.
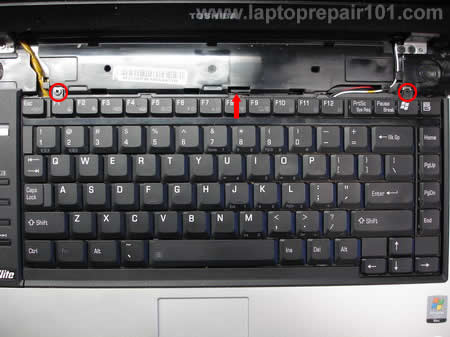
After the bezel is removed you get an access to the keyboard screws. Remove two (or more) screws. Release the plastic latch pointed with the red arrow and lift up the keyboard. Carefully put the keyboard aside so you can access the connector underneath the keyboard. Do not forget that the keyboard is still connected to the motherboard.
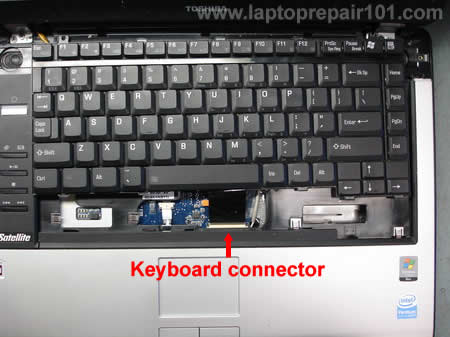
Before you remove the keyboard, you’ll have to open the connector and release the flat ribbon cable.
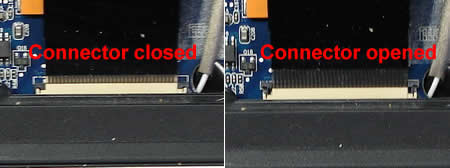
Here’s a closeup picture of the keyboard connector on the motherboard. Be careful, this type of connector is fragile. On the left image the connector is closed. On the right image the connector is opened. Unlock the connector by moving the lock up as it shown on the right image and after that release the ribbon cable. Remove and replace the keyboard. For assembly instructions follow all the steps in the reverse order.
UPDATE. What can you do if the keyboard connector was damaged?
If you are looking for laptop disassembly instructions, check out laptop service manuals.
còn tiếp ...
If your keyboard is missing a key, it’s not necessary to replace the whole keyboard. You can fix it using this guide: how to fix keys on a laptop keyboard.
Warning!
- if your laptop is still covered by the manufacturer’s warranty, do not open the case or you can loose the warranty.
- always remove the battery and unplug the AC adapter before you open the laptop case.
- if you damage the keyboard connector on the motherboard you’ll have to replace the whole motherboard.
- proceed on your own risk.
Sony laptop
I took these pictures from a Sony Vaio PCG-K33 (model PCG-9S1L) notebook. Should be similar for some other Sony notebooks too.
Insert a small flathead screwdriver under the keyboard bezel and carefully lift it up. Continue releasing plastic latches and removing the keyboard bezel with your fingers.
Be careful, on some models the bezel might be connected to the motherboard as it shown on the picture above. If you accidentally pulled the cable, connect it back. It is not necessary to disconnect the keyboard bezel from the motherboard in order to remove and replace the keyboard, just put it aside so you can access the keyboard screws.
Remove three (or more) screws from the top of the keyboard. Carefully lift up the keyboard from the laptop case.
The keyboard connects to the motherboard via a flat ribbon cable. Before you pull the cable from the connector, you’ll have to unlock the connector.
The image above illustrates how to unlock the keyboard connector. Carefully move the connector lock 2-3 millimeters up and after that pull the keyboard cable. To install the keyboard, follow the above mentioned steps in the reverse order.
Toshiba laptop
The following pictures were taken from a Toshiba Satellite A135 laptop. The keyboard removal instructions will be almost the same for most modern Toshiba laptops.
The keyboard bezel removal procedure is similar to the above mentioned Sony Vaio laptop. Lift it up with a small screwdriver and remove using fingers. On most Toshiba laptops the keyboard bezel doesn’t have any circuit board underneath, it’s just a piece of plastic and you don’t have to worry about cables.
After the bezel is removed you get an access to the keyboard screws. Remove two (or more) screws. Release the plastic latch pointed with the red arrow and lift up the keyboard. Carefully put the keyboard aside so you can access the connector underneath the keyboard. Do not forget that the keyboard is still connected to the motherboard.
Before you remove the keyboard, you’ll have to open the connector and release the flat ribbon cable.
Here’s a closeup picture of the keyboard connector on the motherboard. Be careful, this type of connector is fragile. On the left image the connector is closed. On the right image the connector is opened. Unlock the connector by moving the lock up as it shown on the right image and after that release the ribbon cable. Remove and replace the keyboard. For assembly instructions follow all the steps in the reverse order.
UPDATE. What can you do if the keyboard connector was damaged?
If you are looking for laptop disassembly instructions, check out laptop service manuals.
còn tiếp ...
If you find this article useful, please consider making a donation to the author. Thank you!
LÀM THẾ NÀO ĐỄ SỮA KEYBOARD CONNECTOR CŨA LAPTOP .
nguồn : http://www.laptoprepair101.com/laptop/2009/11/17/fix-broken-keyboard-connector-on-laptop-motherboard/
How to fix broken keyboard connector on laptop motherboard
This guide explains how to fix a broken keyboard connector on a laptop motherboard. I do not claim that my instructions will work for any connector type in any laptop brand, but if I can help a few people, I can call my mission accomplished.
Let’s say the keyboard in your laptop stopped working properly and you decided to install a new keyboard yourself. You disassembled the laptop, removed the keyboard, tried to unlock the keyboard connector and… OHH! MAN!… a piece of the locking clip on the connector got broken!
What can you do? Unfortunately, you don’t have a lot of options. The keyboard connector is permanently soldered to the motherboard and cannot be replaced at home. If the connector was damaged, you’ll have to replace the whole motherboard, use the laptop with an external USB keyboard, or…. try the following trick. Hopefully it works or you.
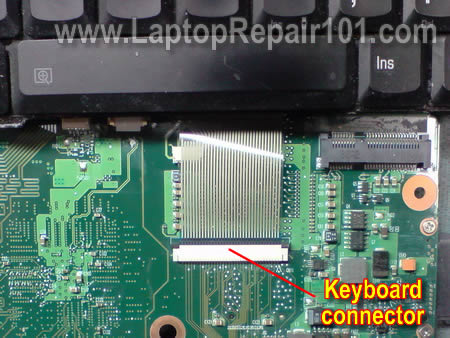
The keyboard cable is locked inside the connector on the motherboard. In order to remove the keyboard, you have to unlock the connector and release the cable.
On the picture below you see one of the most common connectors. It has the base (white in my case) and locking clip (brown in my case). The keyboard cable is jammed between the locking clip and base.
To unlock the connector, you have to move the locking clip about 2 millimeters in the direction shown by two yellow arrows.
IMPORTANT! The locking clip must stay attached to the connector base.
After that you can pull the keyboard cable (green arrow) and remove the keyboard.
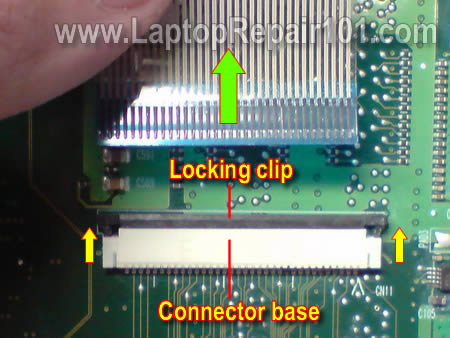
If you are not careful enough, you can move the locking clip too much and break it.
On the picture below you can see the locking clip is missing the left hook.
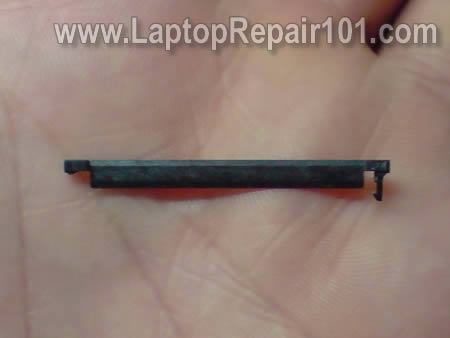
On the next picture both sides of the clip are broken.
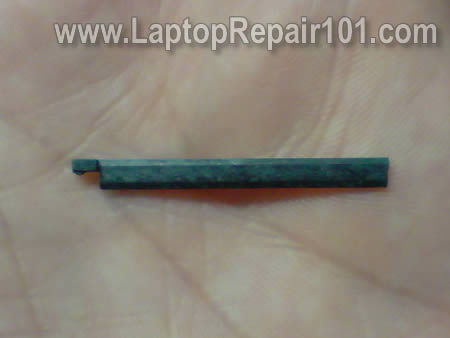
IMPORTANT! Do not though away the broken clip even though it looks completely useless.
If you insert the cable into the connector and will not lock it with a clip, the cable will not make good contact with pins inside the connector and the keyboard will not work.
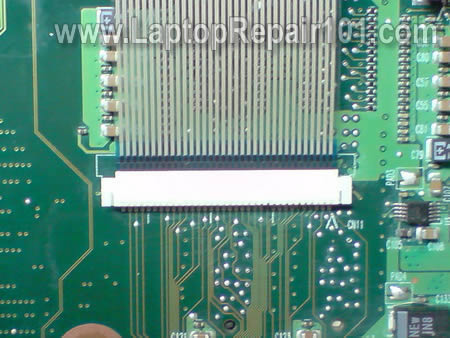
Here’s how to install the broken clip back in place and make it work.
Position the broken clip the way it was before. In my case both sides of the connector are broken. What could have been worse?
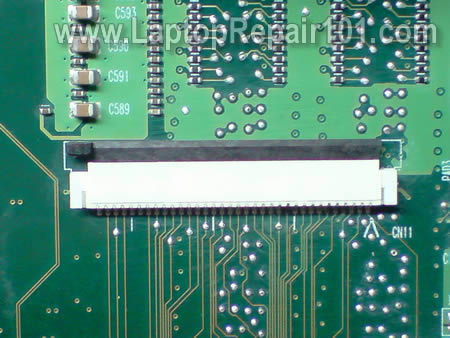
Carefully insert the keyboard cable into the connector. Note, in this type of connector, the cable goes above the locking clip.
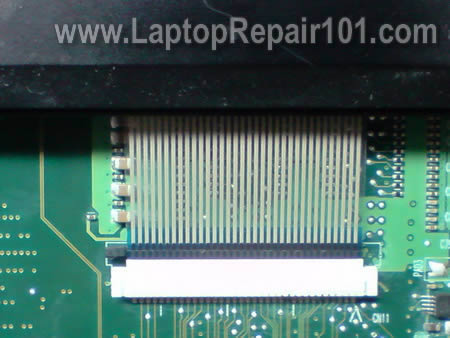
Carefully push the broken clip back in place. You can use a small screwdriver to push on the clip behind the cable.
The clip fits tightly when there is a cable inside the connector.
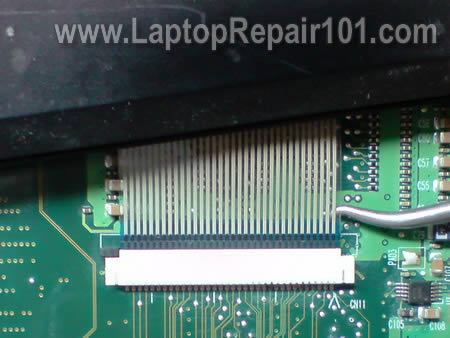
Secure the connection with sticky tape and you should be good to go. The keyboard should work just fine.
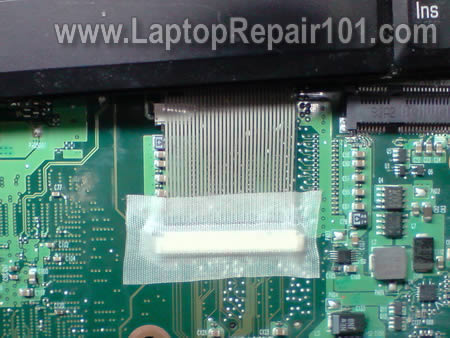
The keyboard connector shown on the following picture is very similar to the previous one. The only difference – the keyboard cable is routed under the locking clip. Fix it the same way as the previous connector.
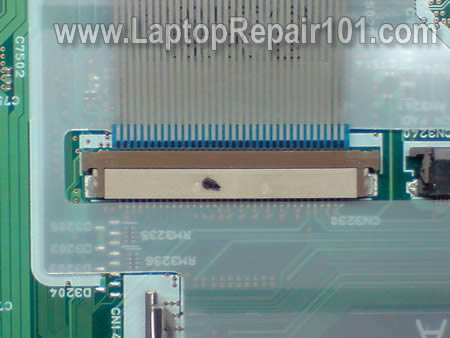
On the next picture you see another type of keyboard connector. The cable is inserted vertically.
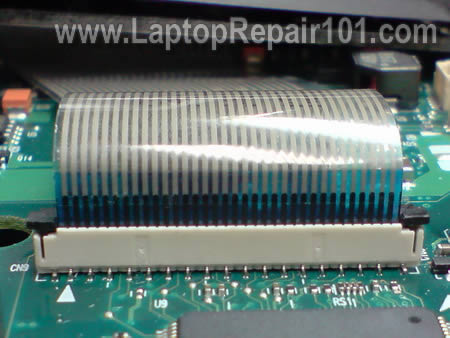
In order to unlock the connector, you’ll have to move the locking clip (brown piece) about 2 millimeters up in the direction shown by two yellow arrows. After that you can pull the keyboard cable (green arrow) and remove the keyboard.
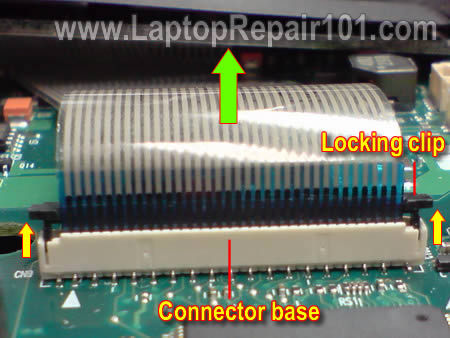
If you move the locking clip too far, you can break it.
In my example the right side of the clip is broken. But you still can use it!
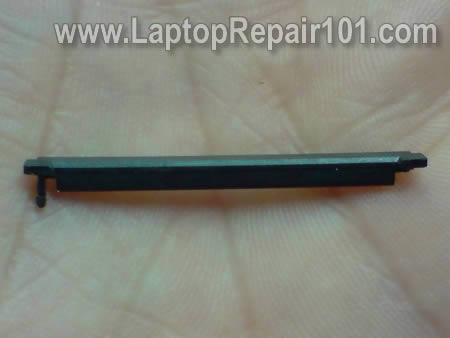
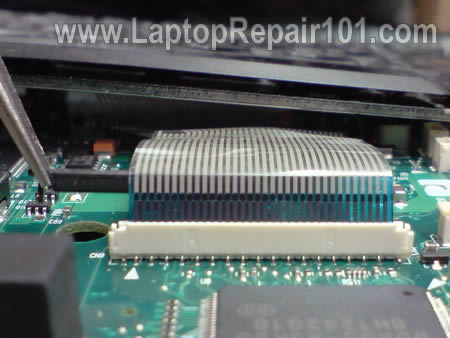
Insert the keyboard cable into the connector, position the broken locking clip correctly (behind the cable in my case) and carefully push it in.
Even with a broken clip the cable will make good connection with the base and the keyboard should work.
Here’s the same connector shown from the opposite side. You cannot even tell if the locking clip is broken.
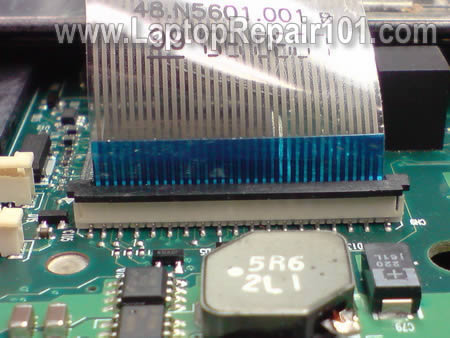
If this trick worked for you, it means I just saved you a few hundred bucks on the motherboard replacement.
I found another way to fix it…
Have you lost the broken “Locking clip”?
Then do this…
Get some “electrical tape” on the back of the “flat cable” to make some “thickness”.
Make sure you are putting the tape on the right side, where there are no visible connections…
Then very carefully push the cable into the connector… It will not come loose and the k
nguồn : http://www.laptoprepair101.com/laptop/2009/11/17/fix-broken-keyboard-connector-on-laptop-motherboard/
How to fix broken keyboard connector on laptop motherboard
This guide explains how to fix a broken keyboard connector on a laptop motherboard. I do not claim that my instructions will work for any connector type in any laptop brand, but if I can help a few people, I can call my mission accomplished.
Let’s say the keyboard in your laptop stopped working properly and you decided to install a new keyboard yourself. You disassembled the laptop, removed the keyboard, tried to unlock the keyboard connector and… OHH! MAN!… a piece of the locking clip on the connector got broken!
What can you do? Unfortunately, you don’t have a lot of options. The keyboard connector is permanently soldered to the motherboard and cannot be replaced at home. If the connector was damaged, you’ll have to replace the whole motherboard, use the laptop with an external USB keyboard, or…. try the following trick. Hopefully it works or you.
The keyboard cable is locked inside the connector on the motherboard. In order to remove the keyboard, you have to unlock the connector and release the cable.
On the picture below you see one of the most common connectors. It has the base (white in my case) and locking clip (brown in my case). The keyboard cable is jammed between the locking clip and base.
To unlock the connector, you have to move the locking clip about 2 millimeters in the direction shown by two yellow arrows.
IMPORTANT! The locking clip must stay attached to the connector base.
After that you can pull the keyboard cable (green arrow) and remove the keyboard.
If you are not careful enough, you can move the locking clip too much and break it.
On the picture below you can see the locking clip is missing the left hook.
On the next picture both sides of the clip are broken.
IMPORTANT! Do not though away the broken clip even though it looks completely useless.
If you insert the cable into the connector and will not lock it with a clip, the cable will not make good contact with pins inside the connector and the keyboard will not work.
Here’s how to install the broken clip back in place and make it work.
Position the broken clip the way it was before. In my case both sides of the connector are broken. What could have been worse?
Carefully insert the keyboard cable into the connector. Note, in this type of connector, the cable goes above the locking clip.
Carefully push the broken clip back in place. You can use a small screwdriver to push on the clip behind the cable.
The clip fits tightly when there is a cable inside the connector.
Secure the connection with sticky tape and you should be good to go. The keyboard should work just fine.
The keyboard connector shown on the following picture is very similar to the previous one. The only difference – the keyboard cable is routed under the locking clip. Fix it the same way as the previous connector.
On the next picture you see another type of keyboard connector. The cable is inserted vertically.
In order to unlock the connector, you’ll have to move the locking clip (brown piece) about 2 millimeters up in the direction shown by two yellow arrows. After that you can pull the keyboard cable (green arrow) and remove the keyboard.
If you move the locking clip too far, you can break it.
In my example the right side of the clip is broken. But you still can use it!
Insert the keyboard cable into the connector, position the broken locking clip correctly (behind the cable in my case) and carefully push it in.
Even with a broken clip the cable will make good connection with the base and the keyboard should work.
Here’s the same connector shown from the opposite side. You cannot even tell if the locking clip is broken.
If this trick worked for you, it means I just saved you a few hundred bucks on the motherboard replacement.
REPAIR TIPS FROM READERS:
Thank you to Alex (Comment 85) for the following suggestion:I found another way to fix it…
Have you lost the broken “Locking clip”?
Then do this…
Get some “electrical tape” on the back of the “flat cable” to make some “thickness”.
Make sure you are putting the tape on the right side, where there are no visible connections…
Then very carefully push the cable into the connector… It will not come loose and the k
Friday, March 29, 2013
How can I connect my laptop using a wired connection?
nguồn : http://www.bestbuy.com/site/Electronics-Promotions/Connect-Laptop-To-TV/pcmcat212600050003.c?id=pcmcat212600050003
To connect your laptop computer to your
TV, all you need is the right cable. Check both components for the
connections shown below. If your TV and laptop don't share a connection,
adapters are available to make the types match and work together.
Selecting the cable
These are the connections you will find, with picture quality ranging from highest to lowest. HDTVs offer multiple connections, with HDMI and DVI being the most common and highest quality options for connecting a laptop to an HDTV. Most standard-definition TVs support an S-Video connection, which delivers a less sharp picture.
HDMI
High-Definition Multimedia Interface or HDMI is currently the highest quality connection available. All HDTVs — not standard-definition TVs — will have this connection. However, your laptop might not. So you may need an adapter to convert the HDMI cable to DVI, a more typical computer connection.HDMI cable costs a bit more than the other cable options, but its superior picture quality might make the cost worth it, depending on your needs.
Shop for HDMI connections and adapters.

Mini DisplayPort-to-HDMI Adapter
For laptops with a Mini DisplayPort, special adapters are available to connect to the DisplayPort. This adapter is then attached to one end of an HDMI cable, while the other end of the HDMI cable connects with your HDTV. It delivers 1080p resolution. Initially developed by Apple for use in all of their Mac products, Mini DisplayPorts are also now included in various new PC laptops.Shop for Mini DisplayPort-to-HDMI adapters.

DVI
Digital Video Interface or DVI is a common connection, so your computer and an HDTV should have it. Again, a standard-definition TV likely won't support a DVI connection.If you want sound with a DVI connection, you will need a separate audio cable. Connect the audio cable from the headphones output of your laptop to the red and white audio input of your TV.
Shop for DVI connections and adapters.

VGA
VGA, or Video Graphics Array, is another commonly found connection on both computers and HDTVs. Just like DVI, VGA does not carry an audio signal. Use the same method above for connecting a 3.5mm stereo audio cable.Shop for VGA cables.

S-Video
Some laptops and most TVs have an S-Video port. An S-Video cable is fairly inexpensive and provides moderate picture quality. As with DVI, you will need a separate audio cable if you want sound.S-Video is generally not suitable for high-definition video signals. HDMI or DVI cables are better options for hooking up to an HDTV.
Shop for S-Video cables.
After selecting the cable
Make sure you connect the cable to the TV before turning on the computer because sometimes it may fail to recognize the external display.Once your cable is connected, select the correct input on your TV — just as you would when using your DVD or Blu-ray player. If the picture appears distorted, you can change the screen aspect ratio and resolution with the Display Settings in the Control Panel of a PC laptop. Mac laptops automatically adjust these picture settings.
How can I connect my laptop wirelessly?
Are there other options for streaming Internet content to my TV?
Wednesday, March 27, 2013
TRONG CÁI HỌA CÓ CÁI PHÚC ; CỖ NHÂN ĐÃ NÓI NHƯ VẬY .
Thưa các bạn ,
Từ ngày chỗ mới này , tôi đã bị trộm hai lần . Và vào tối thứ 7 23/03/13 , sau khi sang phòng kế bên để chuyện vãn với ông bạn già thì tôi về phòng đễ ngũ . Chĩ một lúc sau , khoãng 8 g tối , thì tôi nghe tay nắm cũa cửa bị xoay . Tôi lên tiếng thì kẽ gian bõ chạy về phía cữa thoát hiễm /exit door để ra ngoài . Nói theo kiểu dân gian thì kẽ gian chĩ phóng ba bước là ra ngoài . Phòng tôi vừa ở từng trệt , lại nằm sát một công viên và một bãi để xe vắng vẽ . Tôi có nói với cô Manager là khi có người nào ở từng trên đi thì cho tôi dọn vào ; vì hiện tôi bị trộm rình rập ngày đêm . Tôi đã thảo thư sau để báo CS cũa San Jose .
http://wwwtrananhtu19.
Sau lần trộm thứ 2 thì mỗi khi ra và vào phòng tôi đều khóa cửa . Không như cách đây khoãng 4 tháng , khi còn ở đường Julian ở downtown San Jose , nhiều lần tôi đi ra ngoài 4-5 tiếng đồng hồ mà ko khóa cữa . Nhiều lần , sau khi vô nhà , tôi để chìa khóa găm ở cửa suốt đêm ; đến 10-11 g sáng , khi có bạn bè đến nhà , tôi mới biết . Đó là 1 chúng cư hai từng (có 16 phòng) , cũ khoãng 50 năm , đầy mối mọt v.v... , tôi ở trên lầu và là người VN duy nhứt , còn lại là người Mễ , già lẫn trẻ , có cã trẻ con . Cuộc sống tuy sô bồ , ồn ào , lắm lúc rất dơ bẫn do rác rưới vất tràn lan , v.v...nhưng an ninh rất tốt , ko nghe ai nói bị mất trộm . Tôi đã ở trên 10 năm , vì bị đau đầu gối khi lên xuống cầu thang nên tôi đã rời bõ chổ này . Để về 1 chổ mà mới đầu thấy rất khang trang , lịch sự , 1 trời 1 vực so với chỗ cũ ; nay thì thấy trộm cướp tràn lan , rình rập tôi ngày đêm . Hiện các phòng lân cận , họ cũng cãnh giác như tôi vì đã xãy ra 5 vụ trộm trong mấy năm qua (trong đó 2 vụ cũa tôi) . Chào các bạn ,
Thưa các bạn ,
Từ ngày chỗ mới này , tôi đã bị trộm hai lần . Và vào tối thứ 7 23/03/13 , sau khi sang phòng kế bên để chuyện vãn với ông bạn già thì tôi về phòng đễ ngũ . Chĩ một lúc sau , khoãng 8 g tối , thì tôi nghe tay nắm cũa cửa bị xoay . Tôi lên tiếng thì kẽ gian bõ chạy về phía cữa thoát hiễm /exit door để ra ngoài . Nói theo kiểu dân gian thì kẽ gian chĩ phóng ba bước là ra ngoài . Phòng tôi vừa ở từng trệt , lại nằm sát một công viên và một bãi để xe vắng vẽ . Tôi có nói với cô Manager là khi có người nào ở từng trên đi thì cho tôi dọn vào ; vì hiện tôi bị trộm rình rập ngày đêm . Tôi đã thảo thư sau để báo CS cũa San Jose .
http://wwwtrananhtu19.
Sau lần trộm thứ 2 thì mỗi khi ra và vào phòng tôi đều khóa cửa . Không như cách đây khoãng 4 tháng , khi còn ở đường Julian ở downtown San Jose , nhiều lần tôi đi ra ngoài 4-5 tiếng đồng hồ mà ko khóa cữa . Nhiều lần , sau khi vô nhà , tôi để chìa khóa găm ở cửa suốt đêm ; đến 10-11 g sáng , khi có bạn bè đến nhà , tôi mới biết . Đó là 1 chúng cư hai từng (có 16 phòng) , cũ khoãng 50 năm , đầy mối mọt v.v... , tôi ở trên lầu và là người VN duy nhứt , còn lại là người Mễ , già lẫn trẻ , có cã trẻ con . Cuộc sống tuy sô bồ , ồn ào , lắm lúc rất dơ bẫn do rác rưới vất tràn lan , v.v...nhưng an ninh rất tốt , ko nghe ai nói bị mất trộm . Tôi đã ở trên 10 năm , vì bị đau đầu gối khi lên xuống cầu thang nên tôi đã rời bõ chổ này . Để về 1 chổ mà mới đầu thấy rất khang trang , lịch sự , 1 trời 1 vực so với chỗ cũ ; nay thì thấy trộm cướp tràn lan , rình rập tôi ngày đêm . Hiện các phòng lân cận , họ cũng cãnh giác như tôi vì đã xãy ra 5 vụ trộm trong mấy năm qua (trong đó 2 vụ cũa tôi) . Chào các bạn ,
Tuesday, March 26, 2013
Thư gửi Cãnh sát San Jose về việc trộm thường xuyên rình rập .
From : Tai Tran
1295 McLaughin Ave # 107
San Jose CA 95122
To : SJPD
Dear sir/lady ,
On the night of March 23 , 2013 , after visiting my neighbour (room 105) , I went to bed early . When preparing to sleep , at about 8 PM , I heared the knob of the door (on HALLWAY side) being turned (by someone). I said loudly in Vietnamese "Ai đó/Who is it ? " . The burglar quickly escaped (to the ouside of building) by running to the exit door , NEXT to my apartment .
I think , the burglar(s) followed me CONTINOUSLY and thought I again FORGOT locking the door when visiting my neighbours (in this Senior Center) - as I used to do before . This habit leading to a burglary in my room on Feb 10 , 2013 (Case number 13-041-0879) .
My room is on the FIRST floor of the building and NEXT to a City park and a landscaping company . Therefore , the burglars easily and quickly escape after robbing . Thanks ,
Tai Tran ,
San Jose Mar 25 , 2013 .
From : Tai Tran
1295 McLaughin Ave # 107
San Jose CA 95122
To : SJPD
Dear sir/lady ,
On the night of March 23 , 2013 , after visiting my neighbour (room 105) , I went to bed early . When preparing to sleep , at about 8 PM , I heared the knob of the door (on HALLWAY side) being turned (by someone). I said loudly in Vietnamese "Ai đó/Who is it ? " . The burglar quickly escaped (to the ouside of building) by running to the exit door , NEXT to my apartment .
I think , the burglar(s) followed me CONTINOUSLY and thought I again FORGOT locking the door when visiting my neighbours (in this Senior Center) - as I used to do before . This habit leading to a burglary in my room on Feb 10 , 2013 (Case number 13-041-0879) .
My room is on the FIRST floor of the building and NEXT to a City park and a landscaping company . Therefore , the burglars easily and quickly escape after robbing . Thanks ,
Tai Tran ,
San Jose Mar 25 , 2013 .
Subscribe to:
Posts (Atom)