These instructions will help you to remove and replace keyboards on
various laptops. I will not be able to cover all models but you’ll get
the idea. Steps for removing and replacing the keyboard are similar for
most laptops.
If your keyboard is missing a key, it’s not necessary to replace the whole keyboard. You can fix it using this guide: how to fix keys on a laptop keyboard.
Warning!
- if your laptop is still covered by the manufacturer’s warranty, do not open the case or you can loose the warranty.
- always remove the battery and unplug the AC adapter before you open the laptop case.
- if you damage the keyboard connector on the motherboard you’ll have to replace the whole motherboard.
- proceed on your own risk.
Sony laptop
I took these pictures from a Sony Vaio PCG-K33 (model PCG-9S1L) notebook. Should be similar for some other Sony notebooks too.
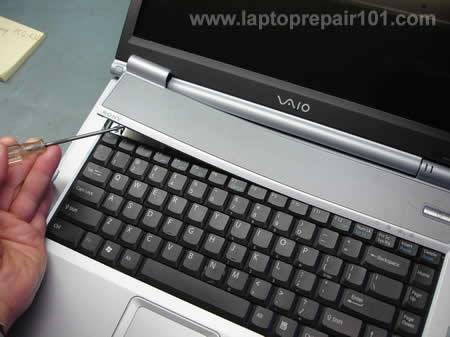
Insert a small flathead screwdriver under the keyboard bezel and carefully lift it up. Continue releasing plastic latches and removing the keyboard bezel with your fingers.
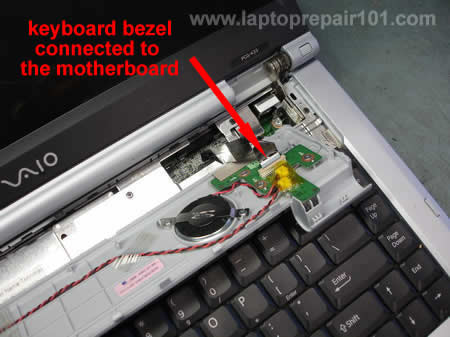
Be careful, on some models the bezel might be connected to the motherboard as it shown on the picture above. If you accidentally pulled the cable, connect it back. It is not necessary to disconnect the keyboard bezel from the motherboard in order to remove and replace the keyboard, just put it aside so you can access the keyboard screws.
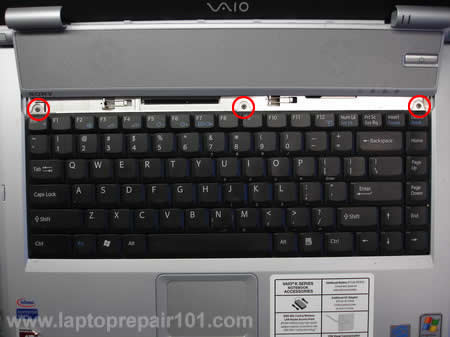
Remove three (or more) screws from the top of the keyboard. Carefully lift up the keyboard from the laptop case.
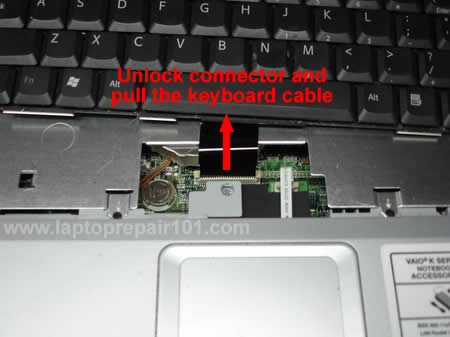
The keyboard connects to the motherboard via a flat ribbon cable. Before you pull the cable from the connector, you’ll have to unlock the connector.
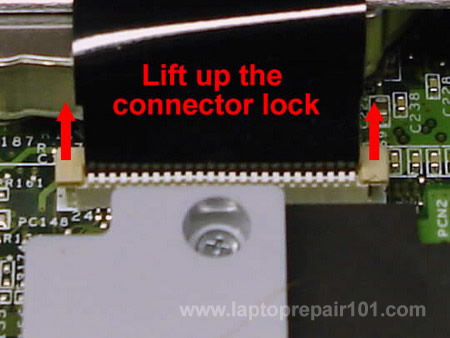
The image above illustrates how to unlock the keyboard connector. Carefully move the connector lock 2-3 millimeters up and after that pull the keyboard cable. To install the keyboard, follow the above mentioned steps in the reverse order.
Toshiba laptop
The following pictures were taken from a Toshiba Satellite A135 laptop. The keyboard removal instructions will be almost the same for most modern Toshiba laptops.
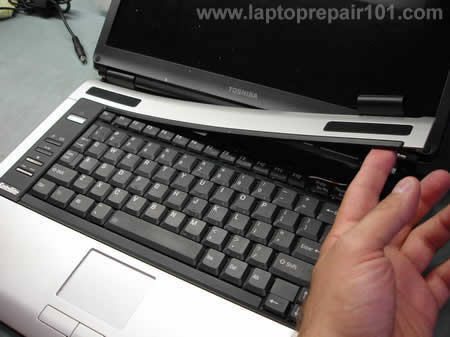
The keyboard bezel removal procedure is similar to the above mentioned Sony Vaio laptop. Lift it up with a small screwdriver and remove using fingers. On most Toshiba laptops the keyboard bezel doesn’t have any circuit board underneath, it’s just a piece of plastic and you don’t have to worry about cables.
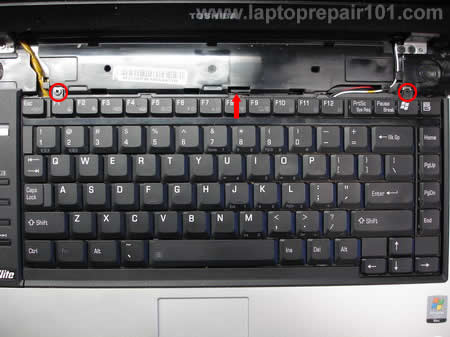
After the bezel is removed you get an access to the keyboard screws. Remove two (or more) screws. Release the plastic latch pointed with the red arrow and lift up the keyboard. Carefully put the keyboard aside so you can access the connector underneath the keyboard. Do not forget that the keyboard is still connected to the motherboard.
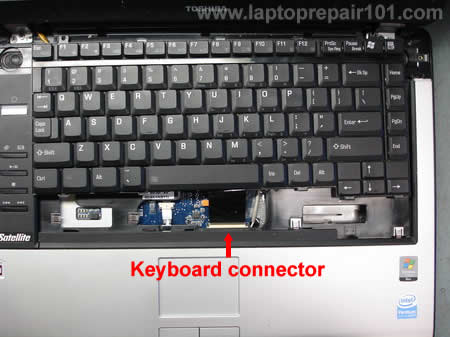
Before you remove the keyboard, you’ll have to open the connector and release the flat ribbon cable.

Here’s a closeup picture of the keyboard connector on the motherboard. Be careful, this type of connector is fragile. On the left image the connector is closed. On the right image the connector is opened. Unlock the connector by moving the lock up as it shown on the right image and after that release the ribbon cable. Remove and replace the keyboard. For assembly instructions follow all the steps in the reverse order.
UPDATE. What can you do if the keyboard connector was damaged?
If you are looking for laptop disassembly instructions, check out laptop service manuals.
còn tiếp ...
If your keyboard is missing a key, it’s not necessary to replace the whole keyboard. You can fix it using this guide: how to fix keys on a laptop keyboard.
Warning!
- if your laptop is still covered by the manufacturer’s warranty, do not open the case or you can loose the warranty.
- always remove the battery and unplug the AC adapter before you open the laptop case.
- if you damage the keyboard connector on the motherboard you’ll have to replace the whole motherboard.
- proceed on your own risk.
Sony laptop
I took these pictures from a Sony Vaio PCG-K33 (model PCG-9S1L) notebook. Should be similar for some other Sony notebooks too.
Insert a small flathead screwdriver under the keyboard bezel and carefully lift it up. Continue releasing plastic latches and removing the keyboard bezel with your fingers.
Be careful, on some models the bezel might be connected to the motherboard as it shown on the picture above. If you accidentally pulled the cable, connect it back. It is not necessary to disconnect the keyboard bezel from the motherboard in order to remove and replace the keyboard, just put it aside so you can access the keyboard screws.
Remove three (or more) screws from the top of the keyboard. Carefully lift up the keyboard from the laptop case.
The keyboard connects to the motherboard via a flat ribbon cable. Before you pull the cable from the connector, you’ll have to unlock the connector.
The image above illustrates how to unlock the keyboard connector. Carefully move the connector lock 2-3 millimeters up and after that pull the keyboard cable. To install the keyboard, follow the above mentioned steps in the reverse order.
Toshiba laptop
The following pictures were taken from a Toshiba Satellite A135 laptop. The keyboard removal instructions will be almost the same for most modern Toshiba laptops.
The keyboard bezel removal procedure is similar to the above mentioned Sony Vaio laptop. Lift it up with a small screwdriver and remove using fingers. On most Toshiba laptops the keyboard bezel doesn’t have any circuit board underneath, it’s just a piece of plastic and you don’t have to worry about cables.
After the bezel is removed you get an access to the keyboard screws. Remove two (or more) screws. Release the plastic latch pointed with the red arrow and lift up the keyboard. Carefully put the keyboard aside so you can access the connector underneath the keyboard. Do not forget that the keyboard is still connected to the motherboard.
Before you remove the keyboard, you’ll have to open the connector and release the flat ribbon cable.
Here’s a closeup picture of the keyboard connector on the motherboard. Be careful, this type of connector is fragile. On the left image the connector is closed. On the right image the connector is opened. Unlock the connector by moving the lock up as it shown on the right image and after that release the ribbon cable. Remove and replace the keyboard. For assembly instructions follow all the steps in the reverse order.
UPDATE. What can you do if the keyboard connector was damaged?
If you are looking for laptop disassembly instructions, check out laptop service manuals.
còn tiếp ...
If you find this article useful, please consider making a donation to the author. Thank you!
No comments:
Post a Comment